TERA Guides
Ravenous Gorge Guide
Introduction
Ravenous Gorge is a 3-man dungeon that is very easy once you go through it once or twice. You do not need a traditional party composition to do this as there will be plenty of buffs the dungeon will give you throughout the run. These buffs appear in the form of flowers when the announcement "Massive flowers appear." pops up. There are 2 flowers, the Vitalia Flower, which will heal your party back to full HP, or the Ardent Azuria flower, which will increase your power by 10% (this buff can stack). You may only choose one of the flowers each time they appear so take your pick and simply attack the flower once. These buffs only appear for the first 2 bosses. In addition, each boss will initially have a shield buff that reduces damage. If you have a healer in your party, they should debuff the boss at the beginning of each battle to remove it. The dungeon can be done in full Idoneal but since there are only 3 people, this may result in each boss taking 10-15 minutes or longer so it might be wise to party with someone who is geared to hurry the run along.
Note: all the of names of the attacks here are arbitrary and are not the name of the official
attacks.


Boss #1: Ardentmaw
This monkey likes to hop around a lot in addition to throwing rocks. Once you get used to the timing of the attacks it'll be an easy win. There are a couple of special phases but they are nothing too hard.
Important Mechanics
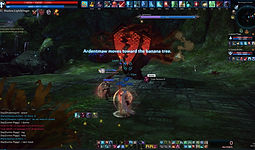
I Need My Steroids: The boss will head to the center of the field and then one of the
following announcements will pop up: "Ardentmaw moves toward the herbs.", "Ardentmaw
moves toward the banana tree.", or "Ardentmaw moves toward the sacrafice.". Once you
know which one the boss is heading to, you must destroy the respective places before the
boss reaches it. The herbs are the blue flowers located in front of the entrace, the banana
tree is located towards the back corner of the field, and the sacrafice is to the left of the
exit. If you successfully destroy the site, then the boss will get knocked down for a few
seconds. Failure to destroy the sites before the boss reaches it will result in the boss
becoming briefly invulernable and then becoming batshit crazy for the next 30 seconds or
so. The boss will constantly do jumps and slams on you until this phase is over, targeting
random players each time.
Tip: If your party failed to destroy the sites in time, instead of having to play
whack-a-mole with the boss, there is a small safezone behind a mushroom located
across from where the entrance is (to the left of where the sacrafice would appear)
that you can hide behind until he calms down. Your party can hide here as the boss
will not be able to jump on you until the phase is over.
Go Forth My Minions: When the announcement "Say hello to my little friends!" appears, the boss will disappear and 3 waves of mini monkeys will spawn. During each wave, you must seek out the 3 monkeys that have the text bubble "Squeek! Squeeeekk!" and kill only these monkeys. If you kill any monkeys that do not have that text bubble, your entire party will be dealt 10k damage. In addtion, if you fail to kill all 3 of the monkeys in the wave within about 15 seconds, your entire party will be dealth 50k damage. Now you may be thinking, well we can just heal the damage. Unfortunately, when this phase is intact, your entire party will be debuffed and will not be able to heal so make sure you don't kill the wrong monkeys as this could potentially wipe your party.
Tip: Be mindful if your attacks have splash or are AOE as it might hit the monkeys you aren't suppose to kill. In addition, if you have pets (i.e. gunner turret) make sure you don't have them out when this phase starts. I had a gunner put out their turret once and it was not fun... you get the picture.
Get Off My Lawn: At 2 points in the fight, a ghost-like figure of the last boss (Nimistrix) will
appear and proceed to target one player (purple agro circle) and dive at them. If you do not
dodge his dive, you will take high damage and be applied a healing debuff that negates all
heals (not cleansable) for a few seconds.
Tip: The dive is easy to dodge. When he appears, if you are the target, get away
from the rest of your party (since the dive is an AOE attack) and stop and look at the
bird. When his eyes flash red, he will begin his dive animation so you can wait about
0.5s then tap your iframe.
Other Mechanics
Hop, Skip, Jump: The boss will randomly jump into the air and slam onto the ground, dealing moderate damage in an AOE around him where he lands, possibly knocking you down. You will get the timing of the iframe once you do it a couple times and it will be quite easy.
Tri-Balls: The boss will randomly target a player (purple agro circle) and then proceed to
launch 3 balls in a cone at their inital location. Simply get out of the way or stand in the
spots between the paths of the balls. If you get hit you will be dealt moderate damage and
sometimes be applied a slow debuff (cleansable).
Rain Of Rocks: The boss will stop and proceed to throw a ring of rocks around him,
dealing high damage with a high possibility of knocking you down. Everyone wil get a
purple agro circle indicator on them before he does this and in order to avoid the attack,
simply get close to the boss or far away from the boss.


Boss #2: Forengula
Nothing too special about this boss. His attacks are easy to avoid and he just lumbers about the whole fight.
Important Mechanics
Charge: When you see the announcement "Rocks rise from the ground. Take cover!", the
person who has the purple agro circle on them must make their way behind one of the
rocks that appear on the edges of the field. After a few seconds, the boss will then make a
charge forward towards the person with the purple circle, one shotting anyone in his way.
If you are behind a rock from when he starts his charge, he will collide with the rock and
become stunned for the next few seconds. If you fail to collide the boss with a rock, he
will charge again 2 more times, meaning you have 2 more chances to get the boss to run
into the rock. If you fail all 3 attempts, then the boss will go into whack-a-mole mode and
bury underground and reappear somewhere nearby, dealing damage upon surfacing for the next 20 seconds or so.
Push Pods: During the fight, when you see the announcement "Forengula summons push pods.", the boss will summon small plants that emit an AOE around them that will push you outwards (deals no damage). The plants' AOE push will start off small and then gradually increase in size. This can make the fight bothersome since if you fight the boss on top of the plants' AOE, you will get pushed around. However, you can kill the plants if you wish.
Tip: You don't have to kill all the push pods if you keep the boss within a small area of the field. That way you only need to kill the ones that are directly where the boss is.
Seriously Get Off My Lawn: At 2 points in the fight, a ghost-like figure of the last boss
(Nimistrix) will appear and proceed to target one player (purple agro circle) and dive at
them. If you do not dodge his dive, you will take high damage and be applied a healing
debuff that negates all heals (not cleansable) for a few seconds. In addition, after his dive,
Nimistrix may flap his wings for a few seconds, dealing damage in small AOE circles
underneath him.
Tip: The dive is easy to dodge. When he appears, if you are the target, get away
from the rest of your party (since the dive is an AOE attack) and stop and look at the
bird. When his eyes flash red, he will begin his dive animation so you can wait about 0.5s then tap your iframe.
Other Mechanics
Tail Swings: The boss will do tail swings from side to side and around him. Be mindful of these and iframe of the way.
Fireworks Flop: The boss will throw rocks around him in small AOEs before finishing it off with a flop that deals moderate damage in an AOE around him. Simply get away from the boss until he is done executing this attack or iframe the flop.
Breath Attack: The boss will randomly target a player (purple agro circle) and then
launch a short range breath attack at them. Simply move to the side to avoid.


Boss #3: Nimistrix
This boss is quite easy as it doesn't move around too much and its attacks are easy to
read and dodge. At the entrance, there will be 3 crystals; you are allowed to break 2 of
them to receive the respective class assistance. If you do not have a tank, it is
recommended that you break the tank crystal to ensure the boss does not randomly
switch targets and to make it easier to DPS the boss. If you do not have a healer, it is
recommended that you break the healer crystal so that when the boss casts certain
buffs on himself, the healer NPC will automatically remove it from the boss. The DPS
crystal will assist you in damaging the boss. The boss also has the same dive
mechanics as his ghost form in addition to a field wipe mechanic, both of which are easily avoided.
Important Mechanics
I Have The Power: When you see the announcement "Nimistrix absorbs nature's energy!", the boss will stand still and begin to channel a spell that will buff him. During this phase, you must interrupt the boss by stunning him or sleeping him. Failure to do so will result in the boss gaining an unremovable buff that will increase his attack.
Tip: To make sure that your stun or sleep will work on the boss, wait a couple
seconds after the accouncement until you see a status icon on the boss bar. When
this appears, the boss will be susceptible to stuns and sleeps and you will have
about 4 seconds to get it off.
My Babies: When you see the announcement "Nimistrix cries out!", the boss will release
a small AOE shockwave around him, dealing damage and one of the eggs at the far end of
the field will grow to a large size and be targetable. You must run to the egg and destroy it
before Nimistrix heads over to it. Failure to destroy the egg in time will result in 3 small
birds spawning. They do not have too much HP but they are an annoyance that can be
easily avoided. After heading over to the egg, Nimistrix will randomly target a player
(purple agro circle) and then face them to do a wing flap attack, which will deal damage
in waves (per flap) in a cone in front of him; he will do this a couple of times and may
switch players. Simply get out of the area or behind the boss to avoid.
Lightning Storm: When the boss gets up and flies to a part of the field and you see the
announcement "Nimistrix calls a storm!", several small, circular areas will appear on the
ground throughout the field. You must get into one of these circles within a few seconds as
the boss will then release a field attack that will one shot anyone outside of those circles.
Do I Have To Do Everything Myself: When the boss flies back to the center of the field
and the announcement "Nimistrix dives *Player*!", the boss will proceed to do the same
dive attack at the chosen person. If you do not dodge his dive, you will take massive
damage (more than his ghost form) and be applied a healing debuff that negates all heals
(not cleansable) for a few seconds. In addition, after his dive, Nimistrix may flap his wings
for a few seconds, dealing damage in small AOE circles underneath him.
Tip: The dive is easy to dodge. When he appears, if you are the target, get away
from the rest of your party (since the dive is an AOE attack) and stop and look at the
bird. When his eyes flash red, he will begin his dive animation so you can wait about 0.5s then tap your iframe.
Bird Armor: When the announcement "Nimistrix's skin is empowered!" , the boss will
receive a defensive buff that is removable. The healer should debuff the boss after this to
remove the buff or if you have the healer NPC summoned, they will remove it from the
boss automatically.
Other Mechanics
Peck: The boss will do a peck in a ground in front of him dealing massive damage in a small AOE.
Wing Attack: The boss will fly slightly into the air and flap his wings, releasing shockwaves
that deal moderate damage per wave in a cone in front of him. Get far from the boss or
behind to avoid.
Bird Bomb: The boss will fly slightly into the air and then drop bombs around him,
causing small, random AOE explosions around him.
Claw Attack: The boss will rear up its claws and then proceed to rush forward with a
clawing motion, dealing high damage to anyone in his path.