TERA Guides
Bathysmal Rise Guide
Normal and Hard Modes
Introduction
Bathysmal rise is not an extremely hard dungeon to do with but it does have its challenges, especially if you are doing it for your first few times. The bosses all have some sort of debuffs that can be applied to you so you must be somewhat coordinated in order to prevent these debuffs from getting out of control. If you are pugging this dungeon, it is extremely important to have a good tank that knows or can catch on quickly to the boss's attack mechanics to make things easier for the party. This dungeon is doable in full Idoneal gear but if everyone in the party is in Idoneal, it will take a LONG time. As for hard mode, it is highly recommended that you have all Ambit gear or higher before attempting it or else you may get one-shotted repeatedly.
Note: all the of names of the attacks here are arbitrary and are not the name of the official attacks.
Boss #1: Mephisis
This boss is just an oversized turtle that spits poison on you. His mechanics are not too
difficult and as long as you dodge all of his attacks you should be fine. There is one phase
that is a DPS race so you also want to make sure your group has a fair amount of damage
output. The tank will want to tank the boss in the area between the two rock holes to allow
for people to be able to seal the rocks when needed. DPS should aim to stay behind the
boss at all times and simply adjust when he targest people with his poison pool.
Important Mechanics
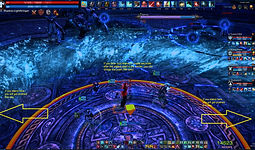
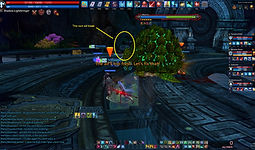
Fix That Leak: At 80%, the boss will announce “The air’s too fresh. Let’s fix that!” and the
rocks on the right hand side will break open. You must seal this hole within a few seconds
(go up to the hole and press F) or else a wave of poison will cover the field, dealing
damage and applying a poison debuff (cleansable) and a distortion debuff (cleared by
jumping). After sealing the rock, every 70 seconds later, the rocks will break again with
the announcement “The rocks scatter again.”. This occurs throughout the rest of the fight.
Hard Mode Version: The right rock will still break at 80% but another rock (on the
left hand side) will now also shatter upon reaching 60%; so now you have 2 rocks
to deal with. In addition, upon breaking, a wave of poison will be immediately
unleashed. Essentially, sealing the holes will cause this mechanic to happen only
once every 70 seconds rather than every 30 seconds.
Tip: Have one of the DPS seal the rock(s) so that the healer can cleanse or heal the
tank if need be.
HM Tip: Since the poison wave will hit immediately upon the rocks breaking,
everyone should gather close enough to the healer when they see the warning announcement so that when the poison wave hits they can quickly cleanse everyone; afterwards the rock plumbers can go do their jobs.
Turtle Squad: When the boss begins to turns blue and glow and says "It's kamaras
all the way down.", he will proceed to summon mini-turtles to aid him. During this phase
you must knockdown the boss to stop his channeling. If you don’t knock him down then
you will have mini-turtles to deal with and they can get quite annoying when you are trying
to seal the rocks and get interrupted by them.
Harden: When the boss tucks inside his shell and turns white, he will initiate his shield
phase where you must DPS and break his shield before it ends within a few seconds.
Failure to break the shield will result in the boss release a poison wave, dealing high
impact damage and applying a strong poison debuff (cleansable).
Hard Mode Version: The poison impact damage and debuff are much stronger.
Tip: If you know you aren’t going to be able to break the shield, gather around the
healer so that when the poison hits, they can cleanse it immediately. Using Kaia’s
Shield with the HP regenerating glyph will help reduce some of the damage received and somewhat counteract the poison debuff if the healer can’t get to everyone in time.
Other Mechanics
Poison Pool: The boss will target a random player (purple agro ring) which will result in a stationary AOE circle to appear underneath them. Dodge out of the circle as the boss will drop a pool of poison, dealing moderate damage.
Poison Ring: The boss will tuck into his shell and a red AOE ring will appear around him. Either get close to the boss or far away from the boss to avoid getting caught in the poison that he sprays in the ring around him. If you get hit, you will take high, multiple-hit damage.
Hard Mode Version: The damage is much, much stronger so do not get hit by this attack.
Spinning Attack: The boss will tuck into his shell, and after a few seconds will proceed
to spin rapidly in place, dealing moderate, multiple-hit damage to those very close to him.
Simply get away from the boss until he stops spinning.
Slam: The boss will slam his head into the ground, the first one in an AOE in front of him and the second one which is in an AOE around him, dealing moderate damage. Those behind the boss that are too close should move back or iframe to avoid the attack.
Flop: The boss’s eyes will flash red and he will then tiptoe twice before slamming the ground with his body, dealing moderate damage in an AOE around him. Stay away from the boss to avoid the attack or iframe right before he hits the ground.
Hard Mode Only Mechanics
Acid Spit: The boss will randomly target a person (purple agro ring) and will launch a straight line of acid at you. If hit you will take high damage and be applied a strong poison debuff (cleansable).
HM Tip: The boss does not follow you after casting the the attack so you can iframe out of the way to avoid it; the timing is similar to that of the poison pool attack.


Boss #2: Tantibus
This boss likes to push people around and run all over the place so it will take some time getting used to his attack patterns. Basically a giant Magikarp but with a few more attacks then just “splash”. The tank should try to keep the boss facing the outer edges of the room so that he doesn’t move around so much. Shift your position if needed, especially if there are too many slime pools in the current area. The boss also has a random assortment of regular attacks that he uses. These do not do too much damage and you will just have to get used to them as they don't really follow a pattern.
Important Mechanics
Fish Ooze: The boss will randomly target a player (purple agro circle), which will then turn
into a homing, red AOE circle. Run away from your teammates into an isolated corner
somewhere as within a few seconds the boss will drop a puddle of slime on you that will
linger around for a while and deals moderate damage as long as you stand on it, in
addition to giving you a debuff that continuously drains your mana (not cleansable). To
clear the debuff, you must take a swim in the pool at the center of the room; this is the
only way to remove the debuff. It is important to make sure that you place the slime circles
away from where the tank and DPS are so they don’t have to move to a new position or
accidentally get hit with the mana debuff (tanks can’t tank without mana).
Hard Mode Version: The pools linger around longer so placement of the pools need
to be kept in mind. Its recommended, if you can, to gather all the pools in an area to
make it easier.
Tip: You can actually dodge the initial damage and debuff application from the pool
being dropped on you by keeping an eye on the boss and hitting your iframe right
before the boss completes his flop.
Magikarps Are Scary: When the boss announces “Can you control your fear? I doubt it!”
and glows blue, your team must knockdown or stagger the boss to interrupt its channel.
Failure to do so will cause the boss to do a flip, and upon landing will place a fear debuff
(cleansable) on everyone.
Tip: If your healer has a cleansing brooch and can get out of it, then they can
cleanse the rest of the group. The fear is possible to iframe if you time it right before
the boss’s flip hits the ground.
Waterspout Wall: When you see the announcement “A waterspout barricades the pool.”, a barrier will block off the pool in the middle of the room. The barrier is easily broken so get a DPS or two on it to break the wall.
Hard Mode Version: The wall has a lot more HP so it is a high priority to destroy the barrier as quickly as you can or else you're going to have a bunch of manaless people running around.
I Just Want A Hug: The boss will suck in any nearby players (~20m) underneath it and then proceed to do a flop on top of them, dealing massive damage.
Tip: It is tricky to iframe the pull as there isn’t much of an indicator although you can tell he is about to do one when you see white water swirl around him. Fortunately, the flop can be iframed; do not panic and wait about 0.5s after you get sucked in and then use your iframe. If you iframe immediately, you will still get hit (I learned that the hard way… many times). Or if you are lucky and are far enough away when he does this you won't get pulled in.
Fishhook: The boss will target a random player (purple agro circle) and after a few seconds will pull that person to the boss and drop the AOE slime pool on them. The tank will have to move the boss afterwards as there is now a slime pool underneath the boss.
Tip: You can iframe the chain but it is very difficult unless you know the timing.
Hard Mode Only Mechanics
Splash Zone: Throughout the fight, when you see the announcement “The pool is
draining”, the room will split into 4 safe zones and 4 danger zones in the shape of a cross.
The danger zones will be defined by a purpleish, watery effect on the room of the floor.
After a few seconds, anyone on the danger zones will be pushed to the perimeter of the
room and take 40k fixed damage.
HM Tip: To avoid, you can either iframe right before the push or if you stand around
the center pool area you will not be affected.


Boss #3: Fulminar
Fulminar is a giant ass and has a wide variety of attacks that he can throw at you. He moves and turns around quite a bit so even with the tank maintaining agro, you will have to be wary when he decides to target his surroundings. The tank should tank the boss against the edge of the room so that Fulminar is facing the wall. This makes avoiding his frontal attacks easier, especially his discsaw attack. The tank may have to reposition and move the boss from time to time depending on where the electric balls accumulate; you defintely do not want to tank on top of those balls. Ranged DPS should arrange themslves directly or diagonally behind him to be able to see his attacks coming. Melee DPS will have to get the hang of his close attacks and be able to dodge or block them. There is also a DPS race mechanic so make sure you have enough damage output.
Important Mechanics
Balls, Balls, and Balls: The boss will randomly target a player (purple agro circle) and proceed to throw 3 lightning balls at them (Fulmispheres). The balls themselves will deal damage in an AOE around them at irregular intervals. The balls can be killed.
Tip: If you are being targetted by Fulminar, stay still and do not move until he has thrown all 3 balls at you; tanking 3 balls will not kill you and will make the fight a lot easier. This will stack all 3 of them in once place, making it easier for your DPS to clear it and also so it doesn't spread all over the room.
Discsaw Party: The boss will lift up his huge disc saw and then slam it in an AOE in front
of him, causing everyone caught in it to be drawn to the center, dealing massive,
multiple-hit damage, and applying a debuff (not cleansable) that will cause you to emanate
an AOE circle around you that will damage any allies in it and grows in size (3 stages).
If you got hit and have the debuff, move away from your teammates until after the debuff
has disappeared. The debuff deals high damage (~20% HP per tick) so it can quickly kill an
ally if you don’t watch where you’re going.
Tip: You can iframe out of the attack if you are on the very edge of the AOE circle
but if you are well within the circle when this happens, don't bother trying to get out
as you will still get hit. Instead, wait about 0.5s from when the circle appears and
then hit your iframe to dodge the attack.
Pizza Cutters: At 90%, 60%, and 30%, the boss will announce “Lets cut you down to size!” and will disappear. 4 clones of the boss will then appear on the outer edges of the room and proceed to dash in straight line to the other side, instantly killing anyone in their way. A red line will mark the path where the pizza cutters will go so get out of the way if you are standing on one. There are safe zones where the pizza cutters will never go through; these correspond to the blue, dome shaped designs and the gold, face designs at points halfway from the center of the room to the perimeter.
Hard Mode Version: To make it even more fun, the pizza cutters this time will not supply you with a nice warning line to tell you where they are going to be. You must scan the room and make sure that there is not one across from you to avoid getting sliced. In addition, after the pizza cutters have finished their rounds, an X-shaped, icy looking trail will be placed on the floor, separating the room into quadrants. The trails will last for about 25 seconds before disappearing and will deal rapid, 30k fixed damage per tick if you stand on them. You want your whole party to be in the same quadrant so if you are not inside, iframe over the ice trail to get with the rest of the team or have a Priest pull you over.
Tsunami: At 85%, 55%, and 25%, an announcement “Water rushes into the chamber.”
will appear. Everyone must head to the center of the room and stand on the small circular
area; anyone that does not make it in time will be automatically killed. Once at the center,
position yourself at the edge of the circle where you wish to be pushed, as when the water
reaches the center, everyone will receive low damage and will be pushed in the direction
relative to where they were on the circle.
Hard Mode Version: The same as normal mode except when you are pushed, you
will take moderate damage and you will also be debuffed with a strong poison
(cleansable). The healer must cleanse everyone immediately afterwards so it is
highly important to make sure everyone is grouped up and gets pushed in the same
direction.
Tip: In normal mode, you can iframe the push if you do it a few seconds after the
waters reach the center and the red circle appears.
Tip: Be alert after you get pushed, especially if the boss appears right next to
everyone as he may proceed to do his discsaw or jump move, which could
potentially hit multiple people as everyone is grouped up.
HM Tip: Have your party stack at the circle and have the healer stand a little to the
left or right of the group so that when you are pushed, the healer is behind you and
can quickly remove the debuffs and heal everyone. Using Kaia's Shield with the HP
regeneration glyph will also mitigate some of the push damage and somewhat
counteract the poison debuff.
Can’t Touch This: When the announcement “Fulminar prepares to strike a fatal blow.”
appears, your team must DPS and break the shield the boss has created. Failure to break
the shield will result in him releasing a massive AOE attack that will also push everyone
away from the boss to the edge of the field. The direction of the push will always be
outwards from where the boss is, so you can use this to position yourself to be flung to
the nearest wall instead of the other side of the room.
Hard Mode Version: Failing to break the shield will result in massive damage and
will also apply a strong poison debuff (cleansable).
Tip: This attack is dodgeable and is quite simple to do. There will be a status icon that appears when he begins channeling this attack that counts down. When the timer hits 5 seconds, use your iframe to dodge the attack. To add a safety net in case you fail to dodge the attack, position yourself between the boss and the nearest wall, so that when you get pushed you will not be flung to the far edges of the room. This is crucial as Fulminar likes to do his annihilation phase right after using this attack and if you are flung too far off, you won't be able to make it back in time.
Annihilation Is Life: Fulminar will announce “I bring you the gift of annihilation!” and will
display a large AOE circle around him. Everyone must get into the circle before he seals it
off; anyone outside of the circle will be killed instantly; if you die, do not resurrect until this
phase is over or else you will just automatically die again. Once the circle is sealed off, the
boss will breakdance and proceed to create two zones around him, the inner circle and
outer circle (not initially visible). The boss has a basic pattern that he will do where one
zone will turn into a danger zone (it will turn red) and then switch. This will happen 3 times.
The danger zones will always be outer, inner, outer so the corresponding safe zones will
always be inner, outer, inner. If you end up in one of the danger zones, you will take massive damage and be pulled to the center where the boss is. At the end of his shenanigans, the boss will jump and slam the ground, dealing moderate damage and breaking the cage so that you can run out again.
Hard Mode Version: The boss will bring up the cage around as normal but he will now have 2 patterns for the danger zones. If the boss turns to the person with the highest agro before breakdancing, then he will proceed with the new pizza shaped zones. Standing on the outer zone of the circle will give you a better chance of getting into the safe zone as the area is bigger. The zones will simply just alternate danger and safe zones between adjacent pizza slices. If the boss does not turn to the person with the highest agro before breakdancing, then he will proceed with the normal outer and inner zones. The jump at the end also now hits harder and will deal massive damage if not dodged.
Tip: The boss is still capable to taking damage so now is the time to DPS as much as you can while he is breakdancing.
Tip: To dodge the boss's jump at the end, simply look at the boss when he jumps and iframe right before he hits the ground.
Other Mechanics
Electric Ring: The boss will create a wide AOE ring around him (similar to the first boss) that, after a few seconds, will pulse with electricity, dealing massive, multiple-hit damage (can one-shot leather and cloth users). Get close to the boss or far away from the boss to avoid.
Side Swipes: Fulminar likes to swing his dics around like its his birthday, which unfortunately for you, does massive, multiple-hit damage. The boss will typically glance in the direction that he is about to swipe so iframe out of range or get to the other side of the boss to avoid. He can do this on his left, right, and can also turn around behind him. Be warned that these attacks have a very long range so be mindful of your positioning.
Jump Jump Jump: The boss will leap into the air and land, causing a huge AOE (~15m) around him that deals massive damage and knocks you back. The attack can be easily iframed.
Zap: The boss will randomly target a player (purple agro circle) and target them with a small, stationary, red circle that drops an electric charge within a second. You can take the hit if you want to as in normal mode this attack hardly does any damage or you can iframe out of it.
Hard Mode Version: This attack hits for high damage and is recommended that you iframe it.
Hard Mode Only Mechanics
Enrage: The boss will enrage below 15%, which causes his power and attack speed to greatly increase, resulting in faster attack animations. He likes to do lots of jumps and electric rings so watch your positioning and iframe to get out of his attacks (in my experience, the super sped up electric ring is usually what kills people). DPS the boss as fast as you can because the longer you drag this part out, the higher the risk that someone is going to potentially get caught and die.
HM Tip: One strategy that you can employ is DPS him down to about ~16-20% and wait for him to do an annihilation phase. When he initaites this phase, DPS him as fast as much as you can before the phase is done to lower him past the 15% threshold. This way, he will enrage at a lower percentage, shortening the amount of time you will have to dance with Fulminar when he is on steroids.